Tracing the Path: How DNS Resolution Works Under the Hood
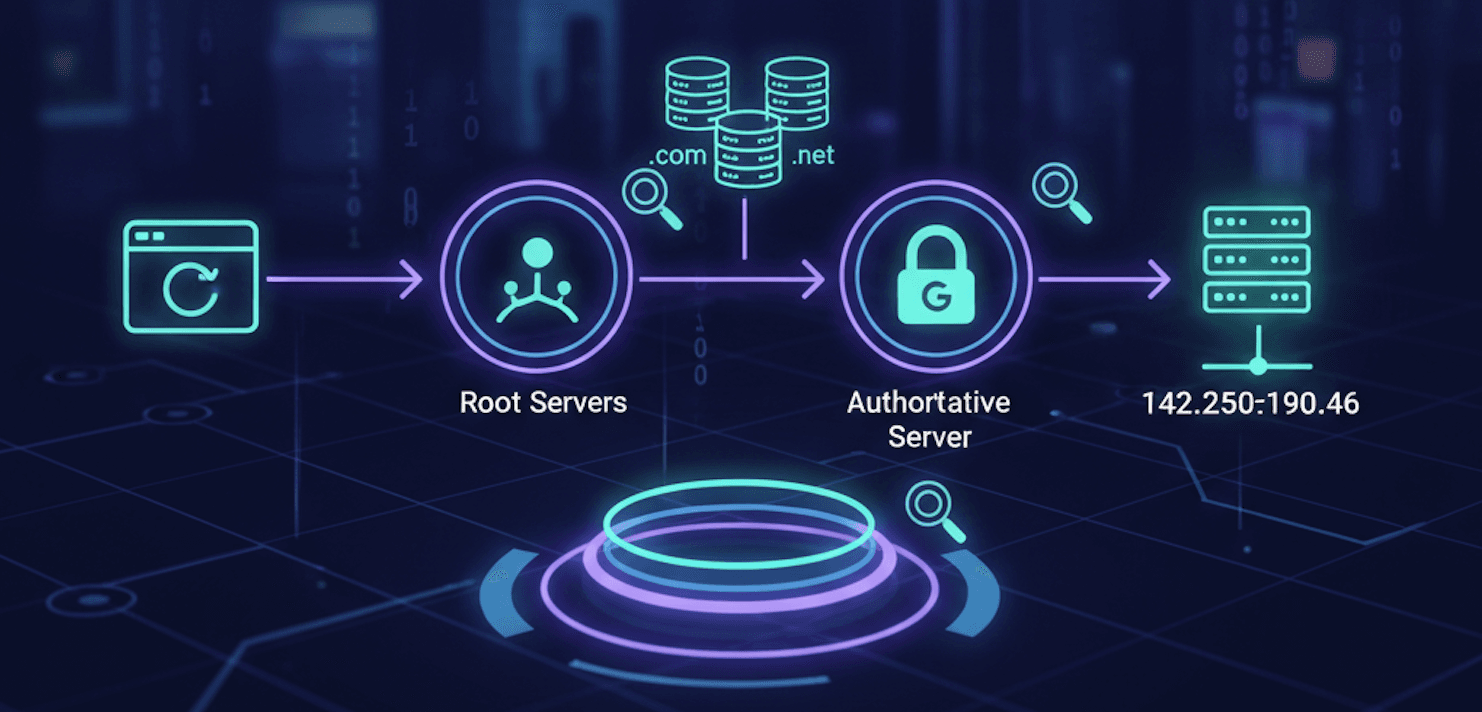
When you type google.com into your browser, a complex chain of events happens in milliseconds. This process is called DNS Name Resolution. Because humans prefer names and computers prefer numbers (IP addresses), we need a "phonebook" to translate them.
While your browser does this automatically, engineers use a powerful command-line tool called dig (Domain Information Groper) to inspect exactly how this lookup happens at every layer.
What is the dig Command?
dig is a network administration tool used for querying DNS name servers. It is the gold standard for troubleshooting DNS issues because it provides detailed information about how a domain is being resolved. Unlike simpler tools, dig shows you the raw answers directly from the name servers.
To understand the full flow, we can use dig to mimic the "recursive" lookup process that happens behind the scenes.

Layer 1: The Root Name Servers (dig . NS)
The resolution process always starts at the very top of the hierarchy: the Root. There are 13 logical root servers worldwide.
To see who they are, run:
dig . NS
What this does: It asks for the NS (Name Server) records of the root (represented by a single dot
.).The Result: You get a list of servers (like
a.root-servers.net). These servers don't know wheregoogle.comis, but they know exactly where to find the servers for.com.
Layer 2: The TLD Name Servers (dig com NS)
Once the root server points us in the right direction, we move to the Top-Level Domain (TLD) layer. This is where domains like .com, .org, and .net are managed.
To find the managers of the .com registry, run:
dig com NS
What this does: It queries the root servers for the name servers responsible for all
.comaddresses.The Result: You’ll see names like
a.gtld-servers.net. These servers still don't have Google’s IP address, but they know who owns the specific record forgoogle.com.
Layer 3: The Authoritative Name Servers (dig google.com NS)
Now we reach the final "source of truth." These are the Authoritative Name Servers. They are owned by the domain owner (Google) or their DNS provider.
To see Google's own servers, run:
dig google.com NS
What this does: It finds the specific servers that have the master record for Google.
The Result: You get servers like
ns1.google.com. These are the only servers that can give you the "Authoritative Answer."
Layer 4: The Final IP Address (dig google.com)
Finally, we ask the authoritative server for the actual address where the website lives.
Run the standard query:
dig google.com
- The Answer Section: This is the most important part of the output. It returns the A record (e.g.,
142.250.190.46).
Putting it Together: The Recursive Resolver
In the real world, your computer doesn't run these four commands. Instead, it asks a Recursive Resolver (like your ISP or 8.8.8.8).
The resolver does the heavy lifting: it talks to the Root, then the TLD, then the Authoritative server on your behalf, caches the result, and hands your browser the final IP. Using dig allows you to "see" these invisible steps.
Summary
dig . NS: Finds the Root.dig com NS: Finds the TLD (registry).diggoogle.comNS: Finds the Authoritative source.diggoogle.com: Gets the final IP address.
By understanding this layered approach, you can pinpoint exactly where a DNS failure is happening—whether it's a domain registration issue (TLD) or a server configuration error (Authoritative).